VIDEO TIP: Two-Camera Video Documentation

We encourage clients producing full evening-length shows that include one's investment into set, light and costume design and of course many many many hours of rehearsal with the cast in the performance creation, produced in any theater venue to also invest in solid multi-camera video documentation. Usually, good clear documentation of said productions can be accomplished with 2 cameras, one Wide Camera (usually located in the back, centered) that captures the full scene of the show/event and one Medium/Close Camera (usually located in the front row on the far left or right side) that captures more of the intimacy of the performance/performers and provides an angle that allows the viewer to feel close to the show. Having both angles allows this intimacy (that mimics the live experience) as well as the full scale and full coverage of one's production. Then we can make an edit of the full show utilizing both angles for ample documentation of the work.

There is always a balance between ideal camera location/s and keeping the disturbance of the cameras to a live audience at a minimum.

Things to consider when choosing camera locations: 1. staging of the show/set If symmetry of staging and large set and/or lighting design is a major component of the work, getting a solid centered wide angle shot is important. If there is a 2nd camera in the front row at an angle, the staging can really dictate which side would be best for capturing closer angle. We want to make sure nothing will be majorly upstaged from a sharper angle for the majority of the show. 2. exit signs in the venue This may seem like a minor detail, but exit signs are actually quite bright, legally cannot be turned off or covered during a show, and are really annoying to look at when constantly in the frame of your documentation. Often venues, especially when curtains are taken down for a show, have exposed exit signs. Sometimes this completely dictates the angle of the Close Camera in order to avoid the exit sign in the frame. 3. curtain wings Sometimes camera locations have to take sharper angles on either side of an audience in order not to block anyone else's view of the show. However, we have to be careful that if there are wings/curtains and performers waiting in the wings during the show, that we try and avoid the camera capturing those performers "off stage". 4. audience heads This one is really really important. Even though we do care about the experience of the live audience (especially when they are one's regular paying patrons), we also cannot compromise the documentation by placing a camera behind an audience member too low so that the heads are in the frame and blocking the camera's view of the performers. This is why we usually place the Wide camera in the back of an audience where it is high enough to stand to get a shot over heads without blocking any audience's view. Then we usually place the 2nd camera in line with the front row (usually sitting in one of the chairs alongside audience) so that the camera is just as high as another head, blending in with the audience and completely free of any audience heads in the way (and also usually at a similar level as the performers, aiding in a more intimate document).

LRP is also very familiar with adapting camera locations and documentation plans for site-specific and/or moving performances or when the artists have re-arranged the typical audience/staging relationship in a venue. We also have lots of experience in figuring out best camera locations in many specific venues in the Bay Area - like Z SpaceODC TheaterJoe Goode Performance AnnexCounterPulseFort MasonYBCA, etc. - so feel free to reach out to us if you ever have questions or ideas on this topic or are interested in getting a quote for a 2-camera shoot of your upcoming show/event!

VIDEO TIP: deciphering video files

the difference between "high res" and "web res" files


We've received some confusion about the various files we send our clients and which is for what. Here is a simple breakdown of the 2 types of files we send after your shoot:

Web ready files (.mp4) These are usually sent via a Vimeo Link. Once an edit is finalized, we encourage our clients to download the web video file if one wants to upload the video to another account/online location.

High res files (.mp4) These are usually sent via WeTransfer or by mail via a returnable thumb drive. Once all editing is finalized, we prepare both the final edits and all the raw footage into high bit-rate H.264 MP4 files (that can be played on any computer) for the Client's archives (on an external hard drive dedicated for video), both for archival purposes and for possible future editing. If the Client were to edit/work with this video on their own or with another editor, these are the files that should be used. We always recommend that everyone get high res files from their videographers when investing in documentation! AND we recommend backing up your video archives in an additional location. Check out more info on that on our Blog.

Video Tip: mobile phone videography pointers

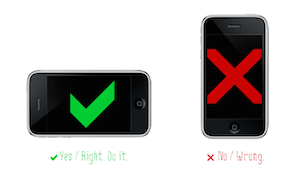
for cleaner and more engaging social media content 1. Shoot landscape! Just do it. It looks more professional (because all professional HD films are 16:9 as well, plus Instagram excepts 16:9 now!).

l3

2. Notice your stance. Like yoga. The steadier the shot, the better. You can make a smoother video getting grounded with your feet hip-width (or wider) apart and knees slightly bent, belly in, the energy of your shoulders/arms/elbows moving toward the ground and a nice easy but firm grip on the phone with two hands. Shoot from your core instead of from your arms!
3. Avoid walking while shooting. At least try. If you want some movement of the frame try taking a wide stance with your feet and moving your center (not just your arms!) from left to right (or right to left) as if you yourself are a track or tripod for smooth camera movement.
4. Pick a good setting/background/lighting. It really counts. Try to avoid shooting into the sun (unless you are going for the backlit look of course). Instead, try shooting where the light naturally falls onto your subject with the least amount of shadows as possible, otherwise the camera will be doing that auto-exposure adjustment thing while you are shooting that immediately gives it a phone video look (what we are trying to minimize). Light your subjects if you can.
Outside almost always looks better than inside, so shoot outdoors (during the day) or near a studio window (with the natural light falling on the subject) when possible!
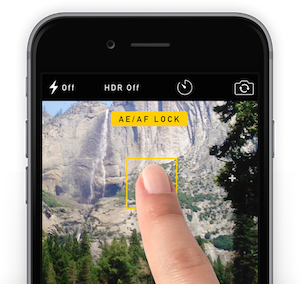
5. Utilize good focus. It can be really beautiful. Pulling your subjects AWAY from a solid background/wall (creating more depth between the subject and the surroundings) allows for the camera on your phone to utilize its depth of field function, which can be really nice. It helps if you move yourself/your camera as close the to your subject as possible. Then, to prevent the camera from auto-adjusting the focus and exposure, you need to lock focus on your subject. To lock focus, just tap and hold for a couple of seconds on the main subject until you see AE/AF LOCK in yellow. (to unlock the focus point, tap anywhere on the screen)
l4
5. Consider your audio situation. It matters. Most people forget or don't realize how effective audio is to video (just try watching any video or film that moves you and turning off the audio, it doesn't have the same hit does it?). If you're outside and it's windy, choose a more wind-protected spot. If you're in the studio, have folks be quiet if there is talking and maybe don't stand right next to the speaker. And as the camera person, be quiet and slow moving yourself.
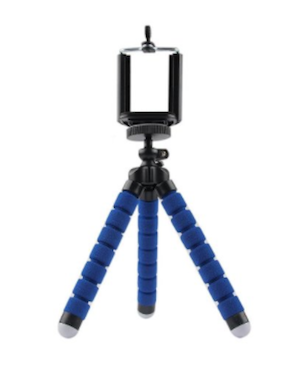
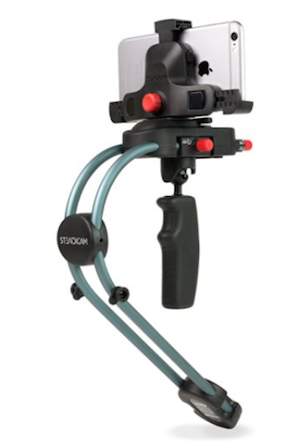
 6. Invest in a little support. Bring it to the professional level. Put a few bucks toward the camera's support for even steadier, smoother phone videos. Here are a couple cost-effective gems:
l5
...for when you want a clean static-camera shot
l6
...for awesomely smooth camera movement. This one is more expensive, but it is THE BEST steadicam for small camera devices.
Check out the steadicam work with my GoPro using the steadicam smoothee when I took it to Ecuador on my DanceMotionUSA trip with CONTRA-TIEMPO (see the beginning of the film for GoPro/steadicam Smoothee action)
If you plan on crafting lots of performance video content for self-promotion on social media, this tool I highly recommend.
7. Frame creatively. Have fun with it. Here's a great example by my colleague Jessica over at Nel Shelby Productions from when we were working at the Vail International Dance Festival together. She took a break during our heavy work day, went hiking in the mountains and took this little dance improv video, framing it pointing up slightly toward the trees and showing just her upper body (wonderfully considering her background and lighting too!)
l7
Happy phone video making and posting!


Videos for Instagram

a step-by-step process for creating and uploading If you have high quality video of your work, why not use it to promote yourself?! Here's a technical guide on how to successfully utilize your video for promotion on Instagram using iMovie

Create your 60 second video for Instagram: You can make a basic excerpt from your video documentation to put on Instagram! Now Instagram allows up to 60 second long videos and 16:9 aspect ratio for your HD video (vs. 15 seconds with square 1:1 crop) 1. Open iMovie and and Create a New Project (choose Widescreen 16:9 for HD footage) 2. Import your HD video documentation files (File, Import, Movie) - this may take several minutes depending on how large your files are) 3. iMovie will create a New Event (the imported video) - rename the Event 4. Then choose 60 seconds (or less) of the video you want to upload to Instagram and drag it to your Project 5. You may want to add simple fades at the beginning and end of the video. Go to Window, Transitions to open the Transitions Tab - Choose Fade To Black and drag to beginning and end of the sequence in your Project Note: you can add multiple clips and try more in depth editing, this is meant for basic excerpts only

Export your 60 second video for Instagram: It's best to make a high quality web video to upload, preferably 1920 x 1080 Follow our steps for best web compression/export on our blog http://www.lorenrrobertson.com/2016/02/bestwebexport/

Transfer your video to your Mobile Device: You'll need to transfer the file to your mobile device in order to upload the video to Instagram and there are several options for this. For iPhone 5 and up users, you can use Apple AirDrop See Apple's specific instructions on sharing content from your computer to your mobile device Or Dropbox When exporting your video, save it to a folder on dropbox. If you have the Dropbox App on your phone, you can open to your 60 second video file and Save the Video to your photo gallery Or GoogleDrive When exporting your video, save it to a folder on GoogleDrive. If you have the GoogleDrive App on your phone, you can open to your 60 second video file and Save the Video to your photo gallery

Upload your 60 second video to Instagram: 1. Open Instagram App on your phone, tap on Camera Icon, navigate to your Gallery and tap your 60 second Video 2. Tap the Crop button on the bottom left to change to 16:9 (vs. the square framing) 3. Add a filter if you'd like and be sure to change the cover image to a nice clear still from the video 4. Then add your caption, hash/tags, location and SEND! (don't forget to tag your performers to credit them and also increase visibility of the video!)

While you're at it, follow us on Instagram too! @lorenrobertsonproductions

Video Tip: Why Vimeo?

Firstly, if you don't have a Vimeo account, we highly recommend it!


Why Vimeo is an essential tool for performing artists:
1. If your performance work includes music that you don't have the rights to, your work samples and videos will get kicked off of Youtube or if you upload it directly to Facebook. However, Vimeo has an excellent Fair Use policy in which this will not be an issue.
2. Clean interface without advertising - good for sharing links as portfolio or for grant applications
3. Downloadability of the video web file - good for sharing with editors and for when others need to upload the videoelsewhere (this is one less step than sharing through something like Dropbox or WeTransfer)


Secondly, if you have a Basic Vimeo account (aka the free version), you may have noticed some changes lately. The one-time upload limit has significantly increased (to the point where we can no longer upload our higher resolution HD webvideos). Additionally, that handy Download button (for viewers) is now only available to:


Vimeo Pro accounts
OR
Vimeo Plus accounts if the user that wants to download the file is logged into a Vimeo account themselves


We have been encouraging our clients to upgrade their Vimeo accounts (to at least Vimeo Plus) so we can upload all of their HD videos to their own accounts as well as for downloadability.


This is the nature of all of these online services - you get enough people dependent on the service, then you limit the free version and create paying subscribers. It's to be expected.
Thankfully for now the Vimeo Plus and Pro accounts have reasonable annual fees only.


That said, we offer to house any videos produced or edited by LRP on LRP's Vimeo account indefinitely, so if the annual fee is an issue, we've got you covered!
 

VIDEO TIP: best export settings for your HD web videos


 If you create your own work samples or promotional edits utilizing professionally shot HD footage of your work, you'll want to make sure you compress the files so that you get the highest resolution possible for best quality viewing on the web! Here are some settings to follow (iMovie is used in this example, but the settings apply in any software):


1. in iMovie, go to Share> Export using QuickTime
2. in the Export box, choose "Movie to MPEG-4"
1
3. Click "Options"
4. For File Format, choose "MP4" (not "MP4 (ISMA))
5. For Video Format, choose "H.264"
6. For Data Rate, enter 20,000 kbits/sec (keep Optimized for: Download)
7. For Image Size, choose "1920 x 1080 HD" (unless your source footage is 720p in which case choose "1280 x 720 HD")
8. For Frame Rate, choose "Current"
9. For Key Frame, choose Every 30 frames (enter "30")
It should look like this in iMovie:
2
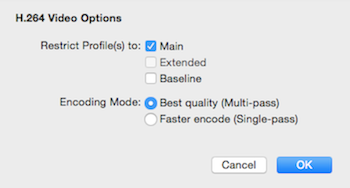
10. Click Video Options...Keep Restrict Profile to "Main" and check "Best quality (Mutli-pass)...Click OK
3
11. Leave other Audio and Streaming settings as and Click OK. Your HD Web Video will begin being created. When it's complete, upload to the Web*!


There are other factors to ensuring highest quality, for example proper sequence settings in your editing software and proper import of the source footage and of course, acquiring the original HD footage from your videographer.


If all this makes your eyes glaze over or your heart race, you can always consider having a professional complete your video post-production needs. Feel free to reach out  for a quote - we'd be happy to help!


*Vimeo does have upload limits, but don't make your video files smaller or you will seriously compromise the quality. We recommend upgrading to Vimeo Plus or Pro if you are uploading regular content. We would also be happy to house any videos we edit for you on LRP's Vimeo account password protected, indefinitely.

VIDEO TIP: Work Sample Compression For Uploading to Grant Application Websites

Sometimes grant applications accept links to video work samples, while other times one is required to upload a video file to the grantor's application website. Here's a step-by-step process to create the proper sized .MP4 (one of the appropriate file types for uploading to the web) while keeping as much quality integrity of the video as possible. **Note: Often there is a total upload limit, which means there will be some math to do on your part - see step #4 below


These steps apply to exporting an HD video file from both iMovie and Final Cut Pro

1. File - Export using Quicktime Conversion

2. A "Save" box opens, under "Format" choose "MPEG-4"

3. Next to "Format", Press the "Options" button

4. Fill in the following settings (from top to bottom)

File Format: choose MP4 (not MP4 (ISMA)) Video Format: h.264 Data Rate: enter 5000* Image Size: choose 1280x720 HD [leave "Preserve aspect ratio..." unchecked] Frame Rate: choose "Current" Key Frame: keep "every" checked and enter "30" frames

* This is the number that you will need to adjust to get the file size you want. Say you are uploading two 5min excerpts and are given a limit of 250MB total. That means they each will need to be under 125MB (totaling 250MB). After you enter this info but before saving, look at the bottom and there is a file size approximation in KB.

Use google to figure the long KB number translated to MB. For example you can enter into a google search "274989KB in MB" and it will tell you the conversion - in this case the file is a little more than 2x too big.

Adjust the Data Rate number - in this case, cut it in half and a little more, say 2200, and the File Size approximation is now 124839 KB which = 124.839 MB (a little under 125MB limit!)

The idea is to get as close to your given limit as possible, as that will make the video file of the highest quality working with the file size constraints.


5. Press "Video Options..." and choose Encoding Mode "Best Quality (Multi-pass)" - press OK


6. OPTIONAL for highest audio quality (do this step before doing your Data Rate math): Navigate to the Audio tab and change Output Sample Rate to 48.000 KHz


7. Press OK and then save

The compression may take several hours. Then you can upload the .MP4 to your online grant application!

[These are essentially the best settings for making video files to upload to Vimeo and Youtube as well, but entering the Data Rate between 5000-10,000.]


Happy grant writing and receiving!


Want more of these tips?  Sign up for our Monthly E-Bulletin!

FREE Download: VLC

Do you operate on a Mac? Do you follow Apple's regular updates?  If so, you've updated your operating system to OS X Mavericks. For better or worse, Apple is constantly updating software and hardware and it can be confusing to keep up with compatability if you're not constantly buying Apple's newest products.


Video Tip:Download VLC!

With Apple's latest OS X Mavericks comes Quicktime 10.3 (automatic update). Unfortunately Quicktime 10.3 has several downsides for the DYI video folks.  One thing to note specifically (especially LRRP clients that have quicktime .mov files in their performance video archives) is that one cannot open and play some .mov files without Quicktime "converting" the file - DO NOT CONVERT YOUR VIDEO FILES WITH Quicktime 10.3!

Instead, everyone, please download free software called VLC.  Use this as the default for playing/viewing video files (directions for changing default below).

DOWNLOAD VLC HERE

vlc

DIRECTIONS TO MAKING VLC THE DEFAULT: 1. Select a video in the Finder 2. choose Get Info from the File menu (or control/right click) 3. under Open With select VLC 4. click on Change All and confirm this action

Further Questions about this?  Ideas?  Feel free to ask/share!


Want more of these tips?  Sign up for our Monthly E-Bulletin!

Video Tip: Plan to gather your archives as you go ...and then back it up!

Have you ever had a videographer document your show or event to then never get your hands on the actual document or even see it? Or do you only have the video in DVD format? Or is it solely online?

For performance, it is essential to have a high quality video archive of your work.  Don't leave it for later.

What do you need for the basics?

1. two external hard drives 2. high resolution video files (of raw and edited material), organized by date and project

Make a point to plan with your videographers BEFORE the documentation of your event, to get a copy of the highest resolution video footage in .mov or .mp4 format. It's important to get the highest quality version of the video so you or an editor can put together your work samples, promotional videos and portfolio edits. Editing with and exporting web resolution video or video ripped from a DVD will look very poor quality.

Put the footage on your external drive and then back it all up to another separate external hard drive.  There should always be at least two versions of ALL your material.  Seriously.  If one drive fails and you only have one copy (and your video peeps don't have a copy), it's gone. The end. Back it up!

Currently, 1TB external drives run around $100-150 each. Here's one I recommend: Seagate 1TB I also recommend these large capacity (64 or 128GB) USB thumb drive for easy file transferring: SanDisk 64GB USB thumb drive

LRP gives EVERY client a copy of all raw footage in high resolution .mp4 format as well as, when applicable, edited material and upload-able video files compressed to look good on the web.  Feel free to email us if have questions or ideas regarding file transfer and format logistics!

Video Tip: Make the most of your Online Videos!

Here's a checklist for making sure your online videos are as accessible and easy to find for audiences and anyone interested in what you do/make as possible:

1. Embed your videos into your Website!

Often I see artists only put a list of links to Vimeo or Youtube videos, which directs the viewer away from the artist's website.  Why not cleanly embed the video into the site for a nice portfolio look that keeps the viewer browsing within the site? **here's some technical guidance on youtube embedding 

2. Use both Youtube and Vimeo

I recommend to clients to put all work samples, highlight reels and promotional edits (anything under 15 min) on both Vimeo and Youtube to increase the potential of an interested viewer finding it online.  If there is a music copyright issue, then Vimeo is the only option. Additionally, I recommend putting full length versions of work on Vimeo (requires having a Vimeo Plus account). **here's a quick and important checklist for cleaning up your links

3. Use Tags!

This seems like a secondary task after uploading a video online, however, adding tags to each video will improve the search engine optimization significantly so that if somebody searches for you/the work, it will be one of the first links in the search engine list.  As a test, search your name/company and one piece of yours on google and see how long it takes to "search" for a video sample of the work. **Some good tags to use are your name, your company name, your city, the title of the work, "dance" or "theater" or "performance", names of performers and collaborators, name of the venue, etc.

4. Share your videos through Social Media

Facebook is a GREAT way to share documentation of your work (as the videos are embedded into the site)!  Tag performers and collaborators and/or post on their individual walls to encourage more traffic.  And a Twitter announcement with a link to the video is always good. Additionally, revisit old videos when you feel inspired to keep them circulating. **Remember to add " &hd=1 " to the end of the url to ensure playback in highest quality


These are basic practices that should be applied each time you upload a new video to add to your online portfolio of work.


Questions?  Ideas?  Feel free to share!


Want more of these tips?  Sign up for our Monthly E-Bulletin!

Video Tip: Clean up your Work Sample Links

It seems to ALWAYS be grant season....and most granters now require links or compressed video files (vs. DVDs) for video submissions to supplement grant applications for performance work.  Here are a few ways to make the most of your video submission:

1.  Clear and Professional Title/Description - make sure, if you haven't already, to add simple text to the description box in the settings of your vimeo or youtube with location, date, and basic credits.  Make a really clear and simple title like the name of the work and "excerpts" and possibly the year.  Keep it professional.

2. Spice up your Profile - add an eye-catching image to your vimeo or youtube profile to avoid the missing person thumbnail that shows up right under the video.  Make sure the name shows up as your actual individual or company name vs. an old hotmail nickname like "luvloren2". Keep it professional.

3. Send the HD Version *this one's a goody!* - vimeo links automatically play in hd if the uploaded video is such. However, you'll need to add &hd=1 to the end of your youtube links for the playback to happen in its highest resolution!!!  I can't stress enough the difference between 360p and 720p playback of a youtube video.  If you invested in high quality video documentation, this little step will help you make the most of your investment!

Take a breath, know you did your best and blow a kiss!

Here's an example of a really nice, clear work sample by Erin Malley:

HAPPY GRANT WRITING!!

Want more of these tips?  Sign up for our Monthly E-Bulletin!

Video Tip: Digitize your DVDs

Best Software for Ripping DVDs

Ideally, you have a digital archive of high resolution video files of all your past work on an external hard drive and then backed up in a second location.  However, most of us have a pile of DVDs of years of performance documentation in varying degrees of quality.  And sometimes it's simply impossible to go back and get a high res version from the videographer. So, at least you have the DVD!

If that's all you have, you gotta digitize your DVD!! (cause that thing won't last forever)

Here's a recommended cheap program for ripping video files off of an authored video DVD (a DVD that will play the video on any DVD player - not to be confused with a data-DVD storing video files):

___________________________________________________

MPEG Streamclip - FREE

In order to use this program for ripping video off DVDs to quicktime, you have to purchase a specific quicktime plugin - $30

___________________________________________________

Directions (after installing software): 1. File - Open DVD (select your DVD) 2. File - Export to Quicktime (unless you know what you're doing, don't mess with the settings) *I encourage you to include "rippedfromDVD" in the file name so you know the file's origin and save in an organized place on an external hard drive specifically for performance documentation archiving 3. Let the program run!

Now, even beautiful high quality documentation originally shot in HD is highly compressed and downgraded to SD when put on an authored video DVD.  When you rip from this already downgraded version, it's compressed and downgraded once again, thus getting your hands on original footage is ideal.  However, if DVD ripping is the only option, this is your best bet!

___________________________________________________

Want more of these tips?  Sign up for our Monthly E-Bulletin!

Video Tip: Embed your Youtube Videos in HD

How to embed your Youtube video to automatically play in HD

Have you noticed lately that Youtube now has an option to play HD videos in HD resolution? (they look beautiful!) However, you have to manually change the setting (by pressing the gear button to set to the highest resolution available).  Let me show you an example of what a difference it makes.  First view this recent CounterPULSE video full screen in standard def (press FULL SCREEN):

...then watch it in high def (press FULL SCREEN): (fyi, add &hd=1 to the end of a url of a youtube link for automatic hd playback)

When embedding a youtube video of your work into your website or blog, why not make it look its best, yes? Here's how you do it: 1. go to the Share tab below the video, then the Embed tab

Screen-Shot-2013-04-18-at-5.04.51-PM1

2. copy the html provided and paste into your site's editor, should look something like this: <iframe width="560" height="315" src="http://www.youtube.com/embed/RrphKwWOfcg?rel=0" frameborder="0" allowfullscreen></iframe>

3. then add the magic html additions (in bold) <iframe width="560" height="315" src="http://www.youtube.com/embed/RrphKwWOfcg?rel=0&vq=hd1080" frameborder="0" allowfullscreen></iframe>

(or ?rel=0&vq=hd720 for 720p)

ta da!

Feel free to contact us if you have problems, questions or ideas!

Want more of these tips?  Sign up for our Monthly E-Bulletin!